Extensions are great! But not simple to build
Chrome extensions are a great way for developers to deliver delightful software to users. If you’ve ever watched a Mr. Beast video, you might be familiar with Honey. Their product is almost entirely based around browser extensions, and Paypal recently bought them for $4 billion! Grammarly, another Chrome extension, recently raised $90 million and is now valued at over $1 billion.

Wouldn’t it be great to build an extension in React? React happens to be one of the most in-demand JS frameworks for building frontend code. Unfortunately, Chrome extensions don’t work the same as traditional web apps. Traditional web apps serve HTML and JavaScript to users, but extensions run JavaScript alongside the browser. Hence, the architecture is entirely different.
When we built DocIt, we spent countless hours trying to make React code compatible with Chrome. We tried following several React+Chrome Extension tutorials available on the web. However, none of them seemed to work too well. Here are some of the issues we encountered:
- Webpack does not create extension-compatible React builds
- React components from your extension will interfere with the CSS styling of visited webpages
- React only renders in 1 HTML document at a time and cannot render in both Popup and Content Script code simultaneously.
Long story short, you can’t just run create-react-app, click export, and expect a working extension.
In this tutorial, we will guide you step-by-step in building your own React-based Chrome Extension. Along the way, we will build a sticky note extension that lets users write, pin, and save notes to any webpage. You can access the code for this extension here. Most of our code will use React, but we will also use a fair amount of vanilla JavaScript.

Skill level
This tutorial is for developers familiar with React and the JavaScript ecosystem.
Prerequisites
To get started with this tutorial, you should be familiar with:
In this tutorial, you will:
- Turn a React App into Chrome Extension-compatible JavaScript
- Create Popups with the Chrome Extension API
- Modify web pages with Content Scripts
- Avoid CSS collisions with Shadow Roots
- Find resources to publish your Chrome Extension to the public and expedite the review process
Starting with a Fresh React App
Before we add the Chrome extension functionality, let’s focus on building a functioning React app.
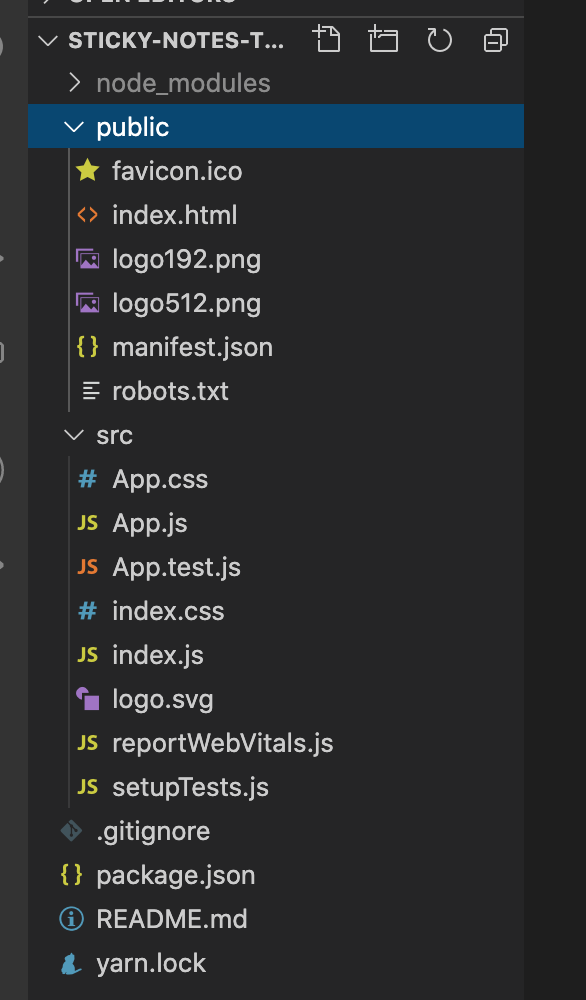
The easiest way to create a new React app is with Create React App. Run npx create-react-app [YOUR_APP_NAME] (we named ours react-Chrome-sticky-note-extension) from the command line, and cd into the resulting directory, and open your favorite code editor (we use VSCode). Running CRA will give you the following boilerplate file structure:
Right off the bat we are going to download a module to help us out with styling our app. From the root directory of your app ([YOUR_APP_NAME), install styled-components into your app, with yarn add styled-components.
Let’s start with a fresh component file StickNotes.js. StickyNotes.js will be our primary component. Also, update the name of the component being rendered in index.js from App to StickyNotes.
// index.js
...
  ReactDOM.render(
    <React.StrictMode>
      <StickyNotes />
    </React.StrictMode>,
    document.getElementById("insertion-point")
...
Next, we are going to make some styled components to use in our StickyNotes component. At the top of StickyNotes.js add the following:
// StickyNotes.js
import styled from "styled-components";

// the components
const Container = styled.div`
  z-index: 2;
  border: 1px solid grey;
  position: absolute;
  background: white;
  top: ${(props) => props.y + "px"};
  left: ${(props) => props.x + "px"};
`;

const Header = styled.div`
  height: 20px;
  background-color: papayawhip;
`;

const StyledButton = styled.button`
  height: 20px;
  border: none;
  opacity: 0.5;
  float: right;
`;

const StyledTextArea = styled.textarea`
  color: dark grey;
  height: 200px;
  width: 200px;
  border: none;
  background-color: hsla(0, 0%, 100%, 0.2);
`;
Note that in Container we are passing props. More on this later.
Let’s create a stateful variable to hold our notes data. We will use the useState React hook:
// StickyNotes.js:
import React, { useState } from 'react'

const StickyNotes = () => {
  const [notes, setNotes] = useState([])

  ...

}
Now, let’s create the functionality that let’s us add sticky notes. When we hold Shift on the keyboard and click, we want a sticky note to render. First, let’s add a listener to the component:
// StickyNotes.js:

// add useEffect to imports
import React, { useState, useEffect } from "react";

...

const StickyNotes = () => {
  const [notes, setNotes] = useState([])

  // listen for shift + click to add note
  useEffect(() => {
    const clickListener = (e) => {
      if (e.shiftKey) {
        setNotes((prevNotes) => [...prevNotes, { x: e.pageX, y: e.pageY }]);
      }
    }
    document.addEventListener("click", clickListener);
    return () => document.removeEventListener("click", clickListener);
  }, []);

  ...

}
In this update, we included a useEffect hook. Note: we are removing the listener on useEffect return because you should always remove your listeners in React, as subsequent renders will keep adding listeners unless they are removed. You can read more about cleaning up effects here. Additionally, note the empty dependency array [] as the second and final argument of the useEffect callback function: this is intentional, as we only need to set the listener once, on the first render. You can read more about dependency arrays in regards to useEffect here.
For the setNotes function call, we are making use of JavaScript’s wonderfully expressive object literal notation, and using the spread operator ... to set our notes variable. You can read more about object destructuring and the spread operator here.
e.pageX, e.pageY are the pixel coordinates of the click on the page. We use these to remember the exact position where we place our sticky notes.
Remember the props we set up to be passed to our Container styled component above? Let’s bring that into play. Let’s set up our return statement:
// StickyNotes.js
...

const StickyNotes = () => {

  ...

  return (
    <div>
      {notes.map((note) => (
        <Container x={note.x} y={note.y}>
          <Header>
            <StyledButton>X</StyledButton>
          </Header>
          <StyledTextArea />
        </Container>
      ))}
    </div>
  );
}
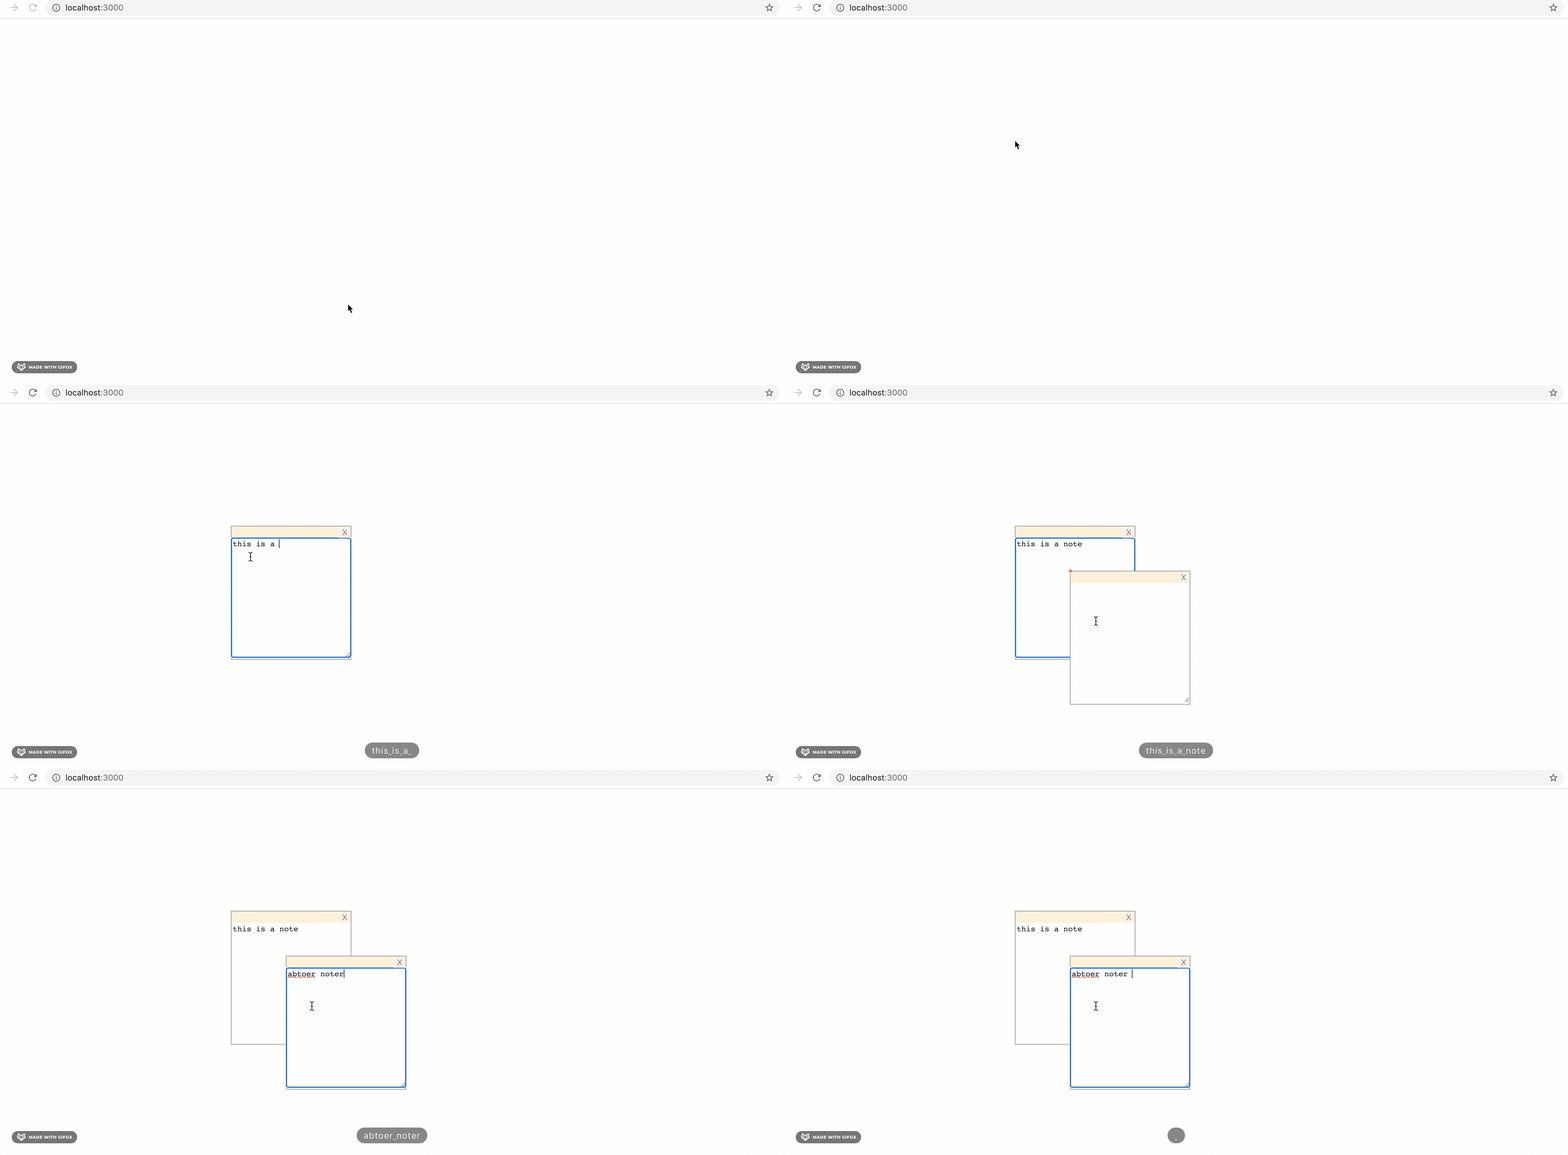
The coordinates we get from our shift + click listener are passed via props to the Container styled component, which then uses those coordinates to absolutely position itself on the page. You should now have some functionality that looks like this:
Although we are able to enter text into the textarea, it is not being saved anywhere. To do this, we need to turn the textarea into a controlled component. You can read more about React controlled components here. We will save the note text from textarea alongside the coordinate data in the notes variable.
In StickyNotes.js, update the component return statement to:
// StickyNotes.js
...
const StickyNotes = () => {

  ...

  return (
    <div>
      {notes.map((note) => {
        const handleChange = (e) => {
          const editedText = e.target.value;
          setNotes((prevNotes) =>
            prevNotes.reduce(
              (acc, cv) =>
                cv.x === note.x && cv.y === note.y
                  ? acc.push({ ...cv, note: editedText }) && acc
                  : acc.push(cv) && acc,
              []
            )
          );
        };

        return (
          <Container x={note.x} y={note.y}>
            <Header>
              <StyledButton>X</StyledButton>
            </Header>
            <StyledTextArea onChange={handleChange} value={note.note ? note.note : ""}/>
          </Container>
        );
      })}
    </div>
  );
}
We again make use of the spread notation, as well as ternary operators (read more here) and the && notation. setNotes here is identifying the note that is being edited (by comparing the coordinates of the note (cv) with the coordinates in the locally-scoped note variable) and adding (or editing) the note property.
The textarea is now a controlled component. You can log notes to the console, and see that is updating as you edit a note.
Next, let’s add functionality for the delete button. Change the component return statement to add the following:
// StickyNotes.js
...
return (
    <div>
      {notes.map((note) => {

        ...

        const handleDelete = () => {
          setNotes((prevNotes) =>
            prevNotes.reduce(
              (acc, cv) =>
                cv.x === note.x && cv.y === note.y ? acc : acc.push(cv) && acc,
              []
            )
          );
        };

        return (
          ...
              <Header>
                <StyledButton onClick={handleDelete}>X</StyledButton>
              </Header>
          ...
        );
      })}
    </div>
  );
We’re done with the core functionality of the app! We can add notes, edit them, and delete them, and it is all saved in a single stateful variable. Next we’ll turn this humble React app into a Chrome extension.
The full code of StickyNotes.js at this point is as follows:
// StickyNotes.js:
import React, { useState, useEffect } from "react";
import logo from "./logo.svg";
import "./App.css";
import styled from "styled-components";

const Container = styled.div`
  z-index: 2;
  border: 1px solid grey;
  position: absolute;
  background: white;
  top: ${(props) => props.y + "px"};
  left: ${(props) => props.x + "px"};
`;

const Header = styled.div`
  height: 20px;
  background-color: papayawhip;
`;

const StyledButton = styled.button`
  height: 20px;
  border: none;
  opacity: 0.5;
  float: right;
`;

const StyledTextArea = styled.textarea`
  color: dark grey;
  height: 200px;
  width: 200px;
  border: none;
  background-color: hsla(0, 0%, 100%, 0.2);
`;

const StickyNotes = () => {
  const [notes, setNotes] = useState([]);

  // listen for shift + click to add note
  useEffect(() => {
    const clickListener = (e) => {
      if (e.shiftKey) {
        setNotes((prevNotes) => [...prevNotes, { x: e.pageX, y: e.pageY }]);
      }
    };
    document.addEventListener("click", clickListener);
    return () => document.removeEventListener("click", clickListener);
  }, []);

  return (
    <div>
      {notes.map((note) => {
        const handleChange = (e) => {
          const editedText = e.target.value;
          setNotes((prevNotes) =>
            prevNotes.reduce(
              (acc, cv) =>
                cv.x === note.x && cv.y === note.y
                  ? acc.push({ ...cv, note: editedText }) && acc
                  : acc.push(cv) && acc,
              []
            )
          );
        };

        const handleDelete = () => {
          setNotes((prevNotes) =>
            prevNotes.reduce(
              (acc, cv) =>
                cv.x === note.x && cv.y === note.y ? acc : acc.push(cv) && acc,
              []
            )
          );
        };

        return (
          <Container x={note.x} y={note.y}>
            <Header>
              <StyledButton onClick={handleDelete}>X</StyledButton>
            </Header>
            <StyledTextArea
              onChange={handleChange}
              note={note.note ? note.note : ""}
            />
          </Container>
        );
      })}
    </div>
  );
};

export default StickyNotes;
Chrome Extension Configuration
Chrome Extensions may seem daunting, but it’s really all just JavaScript. A Chrome Extension is just a set of JavaScript files that run alongside normal webpages. If you know how to use JavaScript, you know how to make Chrome extensions.
Before we start coding, let’s break down how Chrome Extensions are configured.
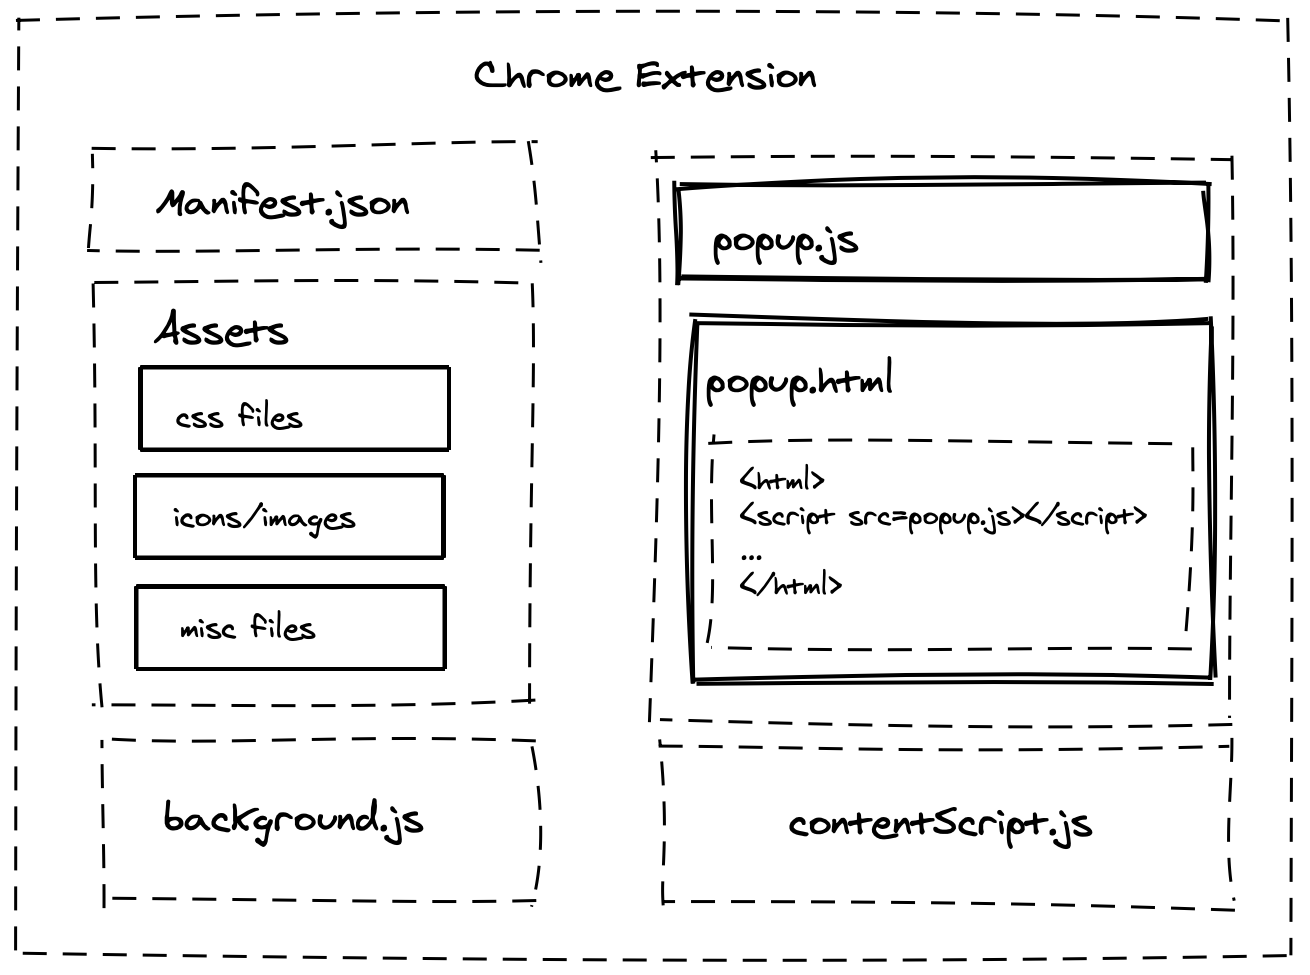
Extensions are generally composed of 3 main JavaScript components: Content Scripts, Popup Scripts, and Background Scripts. Additionally, every Chrome extension must include a manifest.json that tells Chrome how to run your extension.
However, things are a bit different when we’re working with React. When you build a React app, all of the code gets bundled into a single js file by Webpack. Hence, all of our JS that affects UI (content scripts and popup scripts) will be bundled into a single file, main.js.
-
manifest.json- Used to instruct Chrome how to run your scripts. -
background.js- A script that runs behind the scenes from your active web page. This script is usually used for advanced techniques such as message passing or running async computations. We won’t be using background scripts for this tutorial. -
Popup- Popup is the window that launches when you press the extension button on the Chrome Toolbar.
-
popup.html- The HTML document that renders when you click the extension button.popup.jswill be used here. -
popup.js- Code that is executed in the popup window. This script will automatically be bundled intomain.js.
-
-
contentScript.js- A content script is a js file injected into the web page that the user is viewing (i.e. wikipedia.org, google.com, etc.). This script will be responsible for making any changes to the current webpage being viewed. This script will automatically be bundled intomain.js. -
Assets- Any images, css, and other files used by your extension.
We’ll break down each script in the following sections.
Creating the manifest
Every Chrome Extension comes packages with a file called manifest.json. The manifest is used to orchestrate the Chrome Extension and instruct Chrome how and where to run your JavaScript components.
Here is what our manifest.json should look like:
{
  "name": "React Sticky Notes App",
  "version": "1.0.0",
  "manifest_version": 2,
  "description": "Lets you annotate web pages and persists those annotations across page visits.",
  "content_scripts": [
    {
      "matches": ["<all_urls>"],
      "js": ["./main.js"],
      "css": ["/main.css"]
    }
  ],
  "browser_action": {
    "default_popup": "./popup.html"
  },
  "permissions": ["storage"]
}
Metadata
name: The name will appear when on Chrome Extension Store as well as when you select or hover your extension.version: The version of your extension. You can start at any number; however, every time you push an official update to the Chrome Store, you must increment your version.description: Short description of what your app does. Note: This description is entirely separate from the description you will provide on the Chrome store page.
Your metadata will be visible at the url chrome://extensions

Scripts and permissions
-
content_scripts:matches: This is a required field that tells Chrome which pages to run your extension on. Since we are interested in using our extension everywhere on the web, we leave this field as["<all_urls>"]. Otherwise, you can specify a string matching pattern.js: Since we are interested in rendering sticky notes onto our web pages, we need to inject JavaScript onto our page to do it. As mentioned earlier, Webpack will bundle all of the JS in our project into a singlemain.jsfile. So, we will make this field["main.js"].css: Our React code also needs css to make the components look good. So, we need to include themain.cssfile created by Webpack.
-
browser_action: Browser action is used to specify details that are associated with the button on the Chrome Toolbar.default_popup: The popup action can render an HTML document. We will create a special HTML file calledpopup.htmlwith instructions to runmain.jsand render our React Components.
-
permissions: Listing permissions in this array gives you access to certain API operations such aschrome.storageandchrome.bookmarks. For our extension, we will only need access tochrome.storage, so we will usestorage. Note: When you publish to the Chrome store, you cannot request more permissions than your extension actually uses. If you do, your application will be rejected by Chrome store reviewers.
Our popup script will communicate to the content script (and vice versa) by using the chrome.storage api as an intermediary data store.

Make React Compatible with Chrome
Remember we mentioned that extensions are just JavaScript? This is true, but not all JS is created equal. Most JS projects are a mix of JSX, Typescript, JSONs, and other assets spread across multiple files. If you try moving your files into your extension’s package, Chrome won’t know how to read your files and fail to run your extension.
Prevent JavaScript file splitting
By default, Create React App is configured with Webpack. According to Webpack’s documentation: “Code splitting is one of the most compelling features of webpack. This feature allows you to split your code into various bundles which can then be loaded on demand or in parallel.”
Unfortunately for us, code splitting makes it difficult to package our code into an extension.
Additionally, Webpack adds random hashes to the files it builds. (This is to prompt browser to re-fetch files that may have changed between builds instead of relying on cached files). However, this also poses an issue for us because unless we account for the hash changes, we’ll have to change our manifest.json to match the new files names every time we build.
To prevent Webpack from making our extension unusable, we need to run a script to prevent code-splitting. This script allows us to without ejecting from Create React App.
// build-non-split.js
const rewire = require("rewire");
const defaults = rewire("react-scripts/scripts/build.js");
let config = defaults.__get__("config");

config.optimization.splitChunks = {
  cacheGroups: {
    default: false,
  },
};

config.optimization.runtimeChunk = false;
Next, we need to modify our "scripts" section in the app’s package.json to prevent code splitting and hashing.
  ...
  "scripts": {
    "start": "react-scripts start",
    "build": "react-scripts build",
    "build:extension": "node ./scripts/build-non-split.js && yarn build:clean",
    "build:clean": "cd build && mv static/js/*.js main.js && mv static/css/*.css main.css && rm -r static",
    "test": "react-scripts test",
    "eject": "react-scripts eject"
  },
  ...
We modified package.json to include 2 additional commands: build:extension and build:clean.
build:extensionwill run thebuild-non-split.jsfile and prevent Webpack from splitting the JS.- Next,
build:cleanwill rename the bundled js and css into a single set of files calledmain.jsandmain.cssrespectively. Finally, we remove thestaticdirectory, since it is no longer needed.
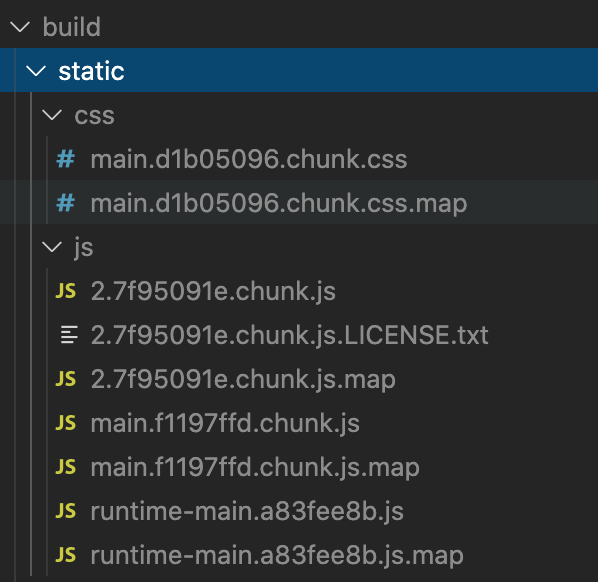
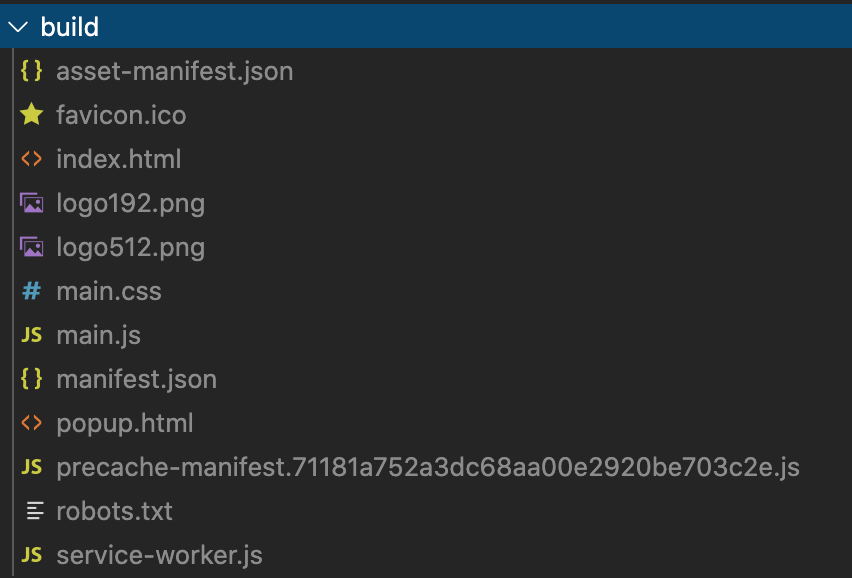
From now on, when we are building our extension, we should run yarn build:extension. Running this command will create a build directory that looks like this:
Now that we have created our React app, written our extension boilerplate, and written build scripts to bundle our React jsx files as a single content script, we will go about adding a database to our React app. Since this is a Chrome extension, we will be using the chrome.storage api (read about it here).
First, add /* global Chrome */ to the top of StickyNotes.js:
// StickyNotes.js
/* global Chrome */
import React, { useState, useEffect } from "react";
...
This will make the Chrome variables available when you run the extension in the browser. But note: Chrome variables are not available when the app is spun up locally! For example, if you try to access Chrome storage via a method like chrome.storage.local.get() while the app is running locally, you will get a syntax error. For this reason, let’s set an environment variable and an easy toggle to access it. We’ll create a .env file in the root folder of the project:
# .env
REACT_APP_LOCAL=true
We’ll also create another file called constants.js, which we’ll reference to determine if the app is running locally:
// constants.js:
export const localMode = process.env.REACT_APP_LOCAL === "true";
When spinning up the app locally, set this REACT_APP_LOCAL to "true". When building it as a Chrome extension, change it to “false”.
In StickyNotes.js, let’s use another useEffect hook to set() our notes data to Chrome storage on a note edit. We will organize our notes by URL; each URL will have it’s own unique set of notes that the React app will save to and retrieve from Chrome storage. Remember to import localMode from constants.js at the top of the file.
Let’s also add a useEffect to access the stored notes data for the URL in question, if there is any.
// StickyNotes.js:
import { localMode } from "./constants";

...

const StickyNotes = () => {
  const [notes, setNotes] = useState([]);
  const url = window.location.href; // save the url to a variable

  ...

  ...


  // get notes if they're there
  useEffect(() => {
    if (!localMode) {
      chrome.storage.local.get(url, (items) => {
        items[url] && setNotes(items[url]);
      });
    }
  }, []);

  // set()
  useEffect(() => {
    if (!localMode) {
      notes.length > 0
        ? chrome.storage.local.set({ [url]: notes })
        : chrome.storage.local.remove(url);
    }
  }, [notes]);

  return (
    ...
  )
}
Note that we are using chrome.storage.local instead of chrome.storage.sync (read about the difference here). We are doing this primarily because of the write limits to sync.
Note also the setter function removes the entry from the database if there are no notes. We don’t want to be piling up URLs in our Chrome storage that don’t have any notes in them!
You now have a fully-functioning notes app Chrome extension! It’s still very bare-bones and there are still some bugs, so let’s continue refining it. The code as of now should look like the below.
// StickyNotes.js:
/* global Chrome */
import React, { useState, useEffect } from "react";
import logo from "./logo.svg";
import "./App.css";
import styled from "styled-components";

import { localMode } from "./constants";

const Container = styled.div`
  z-index: 2;
  border: 1px solid grey;
  position: absolute;
  background: white;
  top: ${(props) => props.y + "px"};
  left: ${(props) => props.x + "px"};
`;

const Header = styled.div`
  height: 20px;
  background-color: papayawhip;
`;

const StyledButton = styled.button`
  height: 20px;
  border: none;
  opacity: 0.5;
  float: right;
`;

const StyledTextArea = styled.textarea`
  color: dark grey;
  height: 200px;
  width: 200px;
  border: none;
  background-color: hsla(0, 0%, 100%, 0.2);
`;

const StickyNotes = () => {
  const [notes, setNotes] = useState([]);
  const url = window.location.href;

  // listen for shift + click to add note
  useEffect(() => {
    const clickListener = (e) => {
      if (e.shiftKey) {
        setNotes((prevNotes) => [...prevNotes, { x: e.pageX, y: e.pageY }]);
      }
    };
    document.addEventListener("click", clickListener);
    return () => document.removeEventListener("click", clickListener);
  }, []);

  // get notes if they're there
  useEffect(() => {
    if (!localMode) {
      chrome.storage.local.get(url, (items) => {
        items[url] && setNotes(items[url]);
      });
    }
  }, []);

  // set()
  useEffect(() => {
    if (!localMode) {
      notes.length > 0
        ? chrome.storage.local.set({ [url]: notes })
        : chrome.storage.local.remove(url);
    }
  }, [notes]);

  return (
    <div>
      {notes.map((note) => {
        const handleChange = (e) => {
          const editedText = e.target.value;
          setNotes((prevNotes) =>
            prevNotes.reduce(
              (acc, cv) =>
                cv.x === note.x && cv.y === note.y
                  ? acc.push({ ...cv, note: editedText }) && acc
                  : acc.push(cv) && acc,
              []
            )
          );
        };

        const handleDelete = () => {
          setNotes((prevNotes) =>
            prevNotes.reduce(
              (acc, cv) =>
                cv.x === note.x && cv.y === note.y ? acc : acc.push(cv) && acc,
              []
            )
          );
        };

        return (
          <Container x={note.x} y={note.y}>
            <Header>
              <StyledButton onClick={handleDelete}>X</StyledButton>
            </Header>
            <StyledTextArea onChange={handleChange} />
          </Container>
        );
      })}
    </div>
  );
};

export default StickyNotes;
Make the Sticky Note a Shadow Component
One very important aspect of creating a browser extension is dealing with how it interacts with the web page’s existing content. A React app is really just JavaScript, and as we saw above when crafting the insertionPoint, in the case of an extension, that js is simply appended to the existing html/js/css of the webpage that it is being run on. This potentially causes nasty styling conflicts, since the html/jss/css that we insert into the webpage via our React app content script is run in the context of the host webpage, which has of course it’s own styling rules.
Let’s look at a concrete example of this. Load your Chrome extension into Chrome, and navigate to www.example.com. Shift + click to add a note, and see what happens.
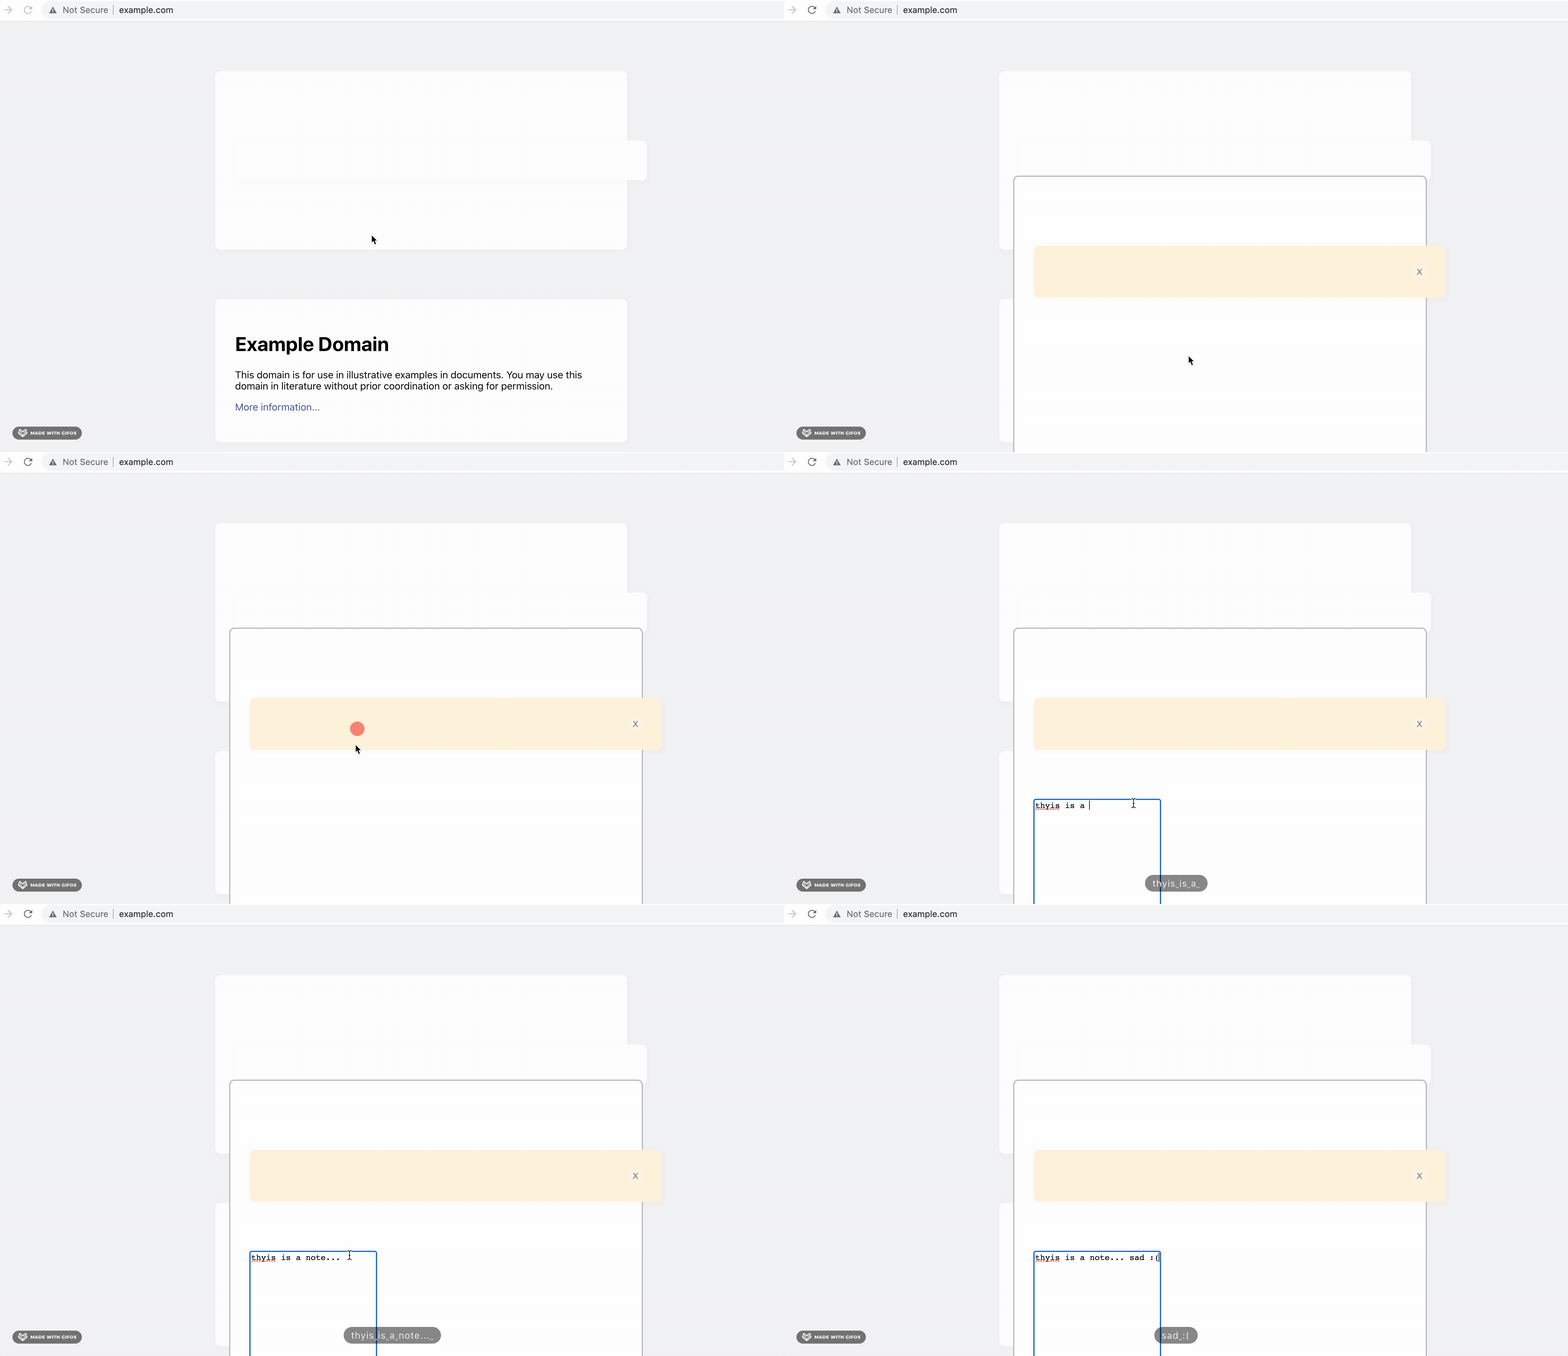
What happened?! www.example.com has its own styling rules, and they are conflicting with the elements rendered by our extension.
There are a few solutions here. The first is to try to override the webpage’s styling by using css techniques that take a higher precedence when the browser is computing styling, such as using !important or inline styling. These are inelegant solutions, both because they could potentially cause the inverse problem (our extension can overriding the page’s styles and break them). Additionally, using !important may cause unintended styling issues and limit our ability to use styled-components.
The second is to render these notes in an <iframe> element. Nothing inherently wrong with this, but it ends up being very complicated and not worth the time. The third method, and the one that we will be using, is to render these StickyNotes components inside of a shadow DOM instance.
You can think of the shadow DOM as a “DOM within a DOM.” Each shadow DOM is cut off from styling rules dictated from outside the shadow DOM, and hence makes it the perfect vehicle for making sure our styles don’t conflict with those of the host webpage. You can read more about shadow DOMs here.
To implement the shadow DOM in our app, we are going to use the module react-shadow. Read more about it in the repo here. Go ahead and add the package to your project via npm i react-shadow or yarn add react-shadow.
Let’s make a new file called ShadowRoot.js in our src folder. Add the code below:
// ShadowRoot.js
import React, { useState } from "react";
import root from "react-shadow";
import { StyleSheetManager } from "styled-components";

export const ShadowRoot = ({ children }) => {
  const [stylesNode, setStylesNode] = useState(null);

  return (
    <root.div>
      <div ref={(node) => setStylesNode(node)}>
        {stylesNode && (
          <StyleSheetManager target={stylesNode}>{children}</StyleSheetManager>
        )}
      </div>
    </root.div>
  );
};
react-shadow creates a new instance of a shadow DOM by wrapping a React component tree in a <div> element to which a shadow DOM is attached. This React component tree is now free from the pesky host page styles, and can style itself how it wants without fear of conflict! Note that we are adding a StyleSheetManager from styled-components. This is necessary, as under the hood, styled-components works by adding a class to each styled component, and specifying in the document <head> the styling of those classes. But since we are now in shadow DOM-land, our React component is cut off from the <head> of the document–so we have to re-insert those styles into the shadow DOM.
Import ShadowRoot into StickyNotes.js and wrap the component, like so:
// StickyNotes.js:
...
import { ShadowRoot } from "./ShadowRoot";

...
...

return (
    <div>
      {notes.map((note) => {
        const handleChange = (e) => {
          ...
        };

        const handleDelete = () => {
          ...
        };

        return (
          <ShadowRoot>
            <Container x={note.x} y={note.y}>
              <Header>
                <StyledButton onClick={handleDelete}>X</StyledButton>
              </Header>
              <StyledTextArea onChange={handleChange} />
            </Container>
          </ShadowRoot>
        );
      })}
    </div>
  );
Go back to www.example.com, and voila! Our notes look the way we want them to.
Add a dashboard / popup.html
At this point we have a decent notes app, but it can still be better. And we also have yet to make use of the Chrome extension popup page, which is probably the most recognizable feature of a Chrome extension.
For our popup page, we will be making a dashboard showing all the URLs that we have notes on, as well as all the notes at those URLs. A library for our notes, if you will. This will demonstrate a) how to inject React into the Chrome extension popup, and b) a way to communicate between the popup and the content script via chrome.storage.
The mechanics of creating the popup page component are pretty similar to how we made our StickyNotes component. We will use useEffect to query chrome.storage.local, set to a notes stateful variable, and use styled-components as our styling solution.
PopupComponent.js:
// popupComponent.js
/* global Chrome */
import React, { useState, useEffect } from "react";
import styled from "styled-components";

import { localMode } from "./constants";

const ListNoMarker = styled.ul`
  list-style-type: none;
  padding: 0;
`;

const UrlP = styled.p`
  background: papayawhip;
  margin: 0.5em;
  padding: 0.5em;
  overflow: scroll;
`;

const UrlEntry = ({ entry }) => {
  const [open, setOpen] = useState(false);
  const url = entry[0];
  const notes = entry[1];

  return (
    <li onClick={() => setOpen(!open)}>
      <UrlP>
        <b>{url}</b>
      </UrlP>
      {notes && (
        <ul style={open ? { display: "inherit" } : { display: "none" }}>
          {notes.map((note) => (
            <li>{note.note}</li>
          ))}
        </ul>
      )}
    </li>
  );
};

export const PopupComponent = () => {
  const [notes, setNotes] = useState([]);

  // get notes to display in popup.html
  useEffect(() => {
    if (!localMode) {
      chrome.storage.local.get((items) => {
        setNotes(items);
      });
    }
  }, []);

  return (
    <div>
      <h3>Hello from sticky notes!</h3>
      <p>
        Press{" "}
        <strong>
          <i>Shift</i>
        </strong>
        + click to make a new note.
      </p>
      <h4>Your notes:</h4>
      {notes && (
        <ListNoMarker>
          {Object.entries(notes).map((entry) => (
            <UrlEntry entry={entry} />
          ))}
        </ListNoMarker>
      )}
    </div>
  );
};
The tricky part comes in making sure that PopupComponent gets where it needs to go (the popup.html) and doesn’t go where it isn’t needed (in the sticky notes).
Remember in manifest.json, assigning the default popup like so?
// manifest.json
{
  ...
  "browser_action": {
    "default_popup": "./popup.html"
  }
  ...
}
Add a new file popup.html to the public directory. In it, put:
<!-- popup.html: -->
<!DOCTYPE html>
<html lang="en">
  <head>
    <meta charset="UTF-8" />
    <meta name="viewport" content="width=device-width, initial-scale=1.0" />
    <title>Sticky Notes</title>
    <style>
      body {
        height: 400px;
        width: 400px;
      }
    </style>
  </head>
  <body>
    <div id="popup-root"></div>
  </body>
  <script src="./main.js"></script>
</html>
Now, in index.js, modify it so it looks like:
//index.js
import React from "react";
import ReactDOM from "react-dom";
import "./index.css";
import StickyNotes from "./StickyNotes";

import { PopupComponent } from "./PopupComponent";

const popupRoot = document.getElementById("popup-root");

const insertionPoint = document.createElement("div");
insertionPoint.id = "insertion-point";
document.body.parentNode.insertBefore(insertionPoint, document.body);

// StickyNotes / content script
!popupRoot &&
  ReactDOM.render(
    <React.StrictMode>
      <StickyNotes />
    </React.StrictMode>,
    document.getElementById("insertion-point")
  );

// PopupComponent / popup.html
popupRoot &&
  ReactDOM.render(
    <React.Fragment>
      <PopupComponent />
    </React.Fragment>,
    popupRoot
  );
How is this working? Well, when we build the React app, all these files are going to be in the build directory. In popup.html, we are loading up main.js via a <script> tag. main.js will run like a normal js file, having access to the DOM of popup.html.
In index.js, we have created a way for our React app to render different parts of the app into different HTML files. It will search the DOM for the popup-root id, and if it’s there, render the PopupComponent, and if it’s not, render the content script for the sticky notes.
Testing your extension
Now that we’ve finished building our extension let’s try it out.
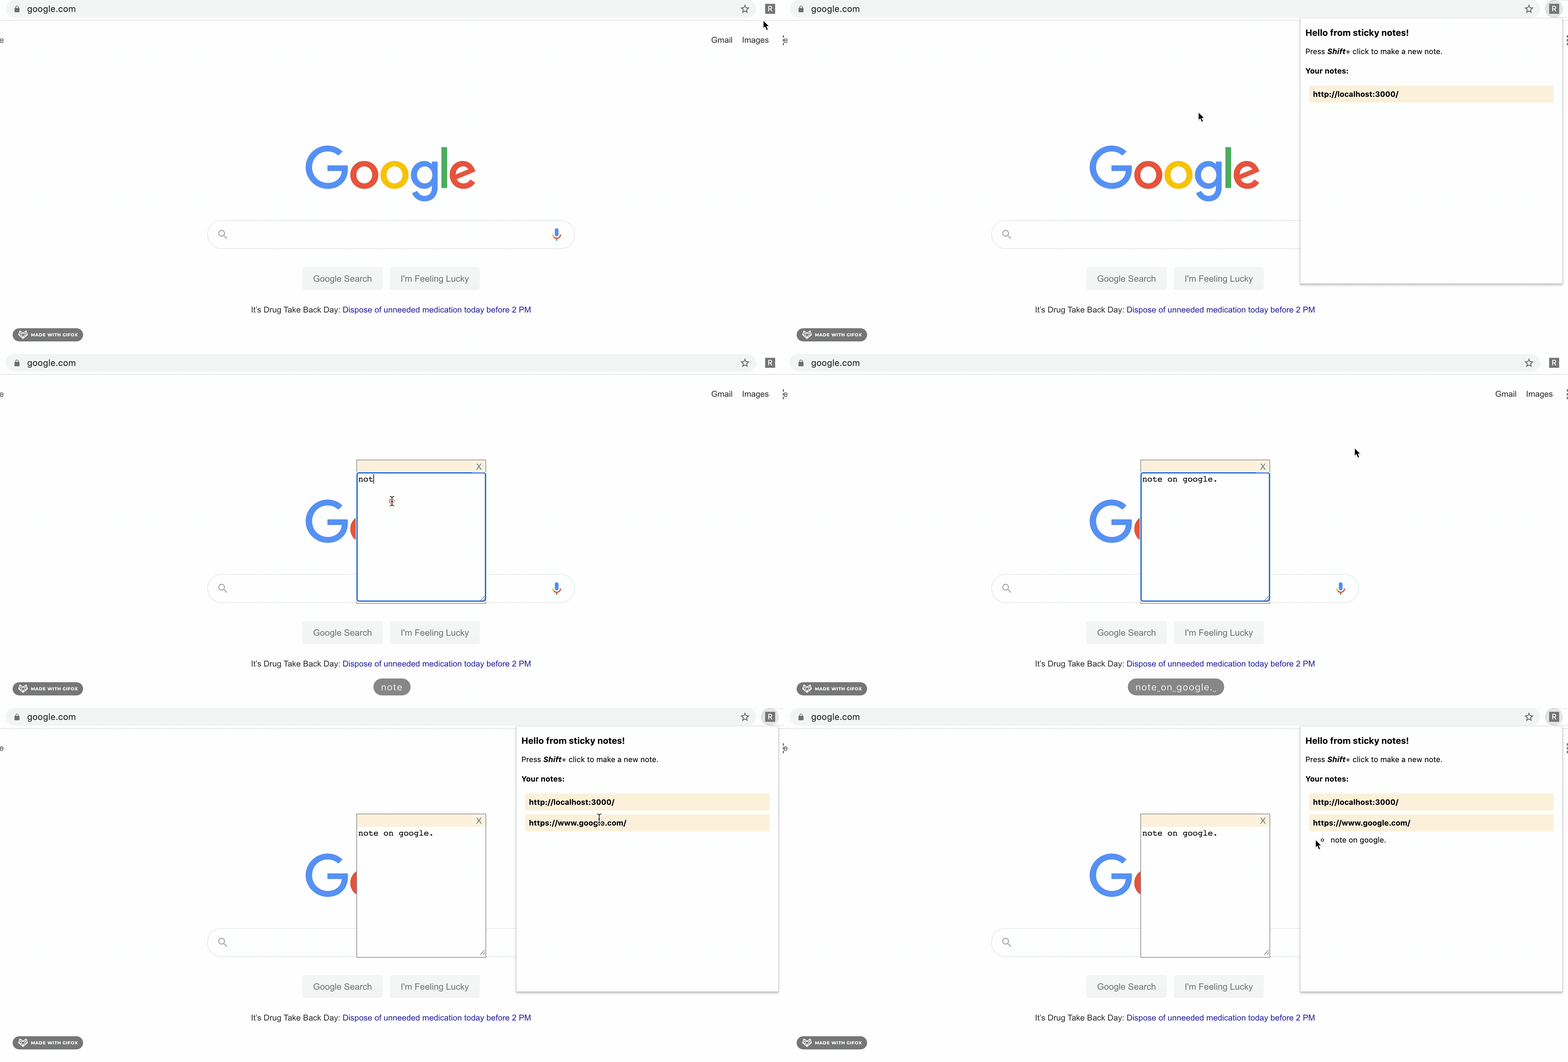
First, navigate to chrome://extensions in the URL bar. Next, enable Developer Mode in the top right corner. And lastly, click Load Unpacked and upload your build folder. That’s it!

Now, we can play around with our extension on any page.
Summary
To wrap up, here’s what we learned:
-
Creating a Chrome Content Script that injects itself on every webpage and renders React Components
-
Created a Popup Script that renders an HTML document with React
-
Interfaced with the Chrome storage API
-
Modified our build instructions to make our build extension compatible